


How to Create a Hidden Wood Slat Door in 7 Easy Steps
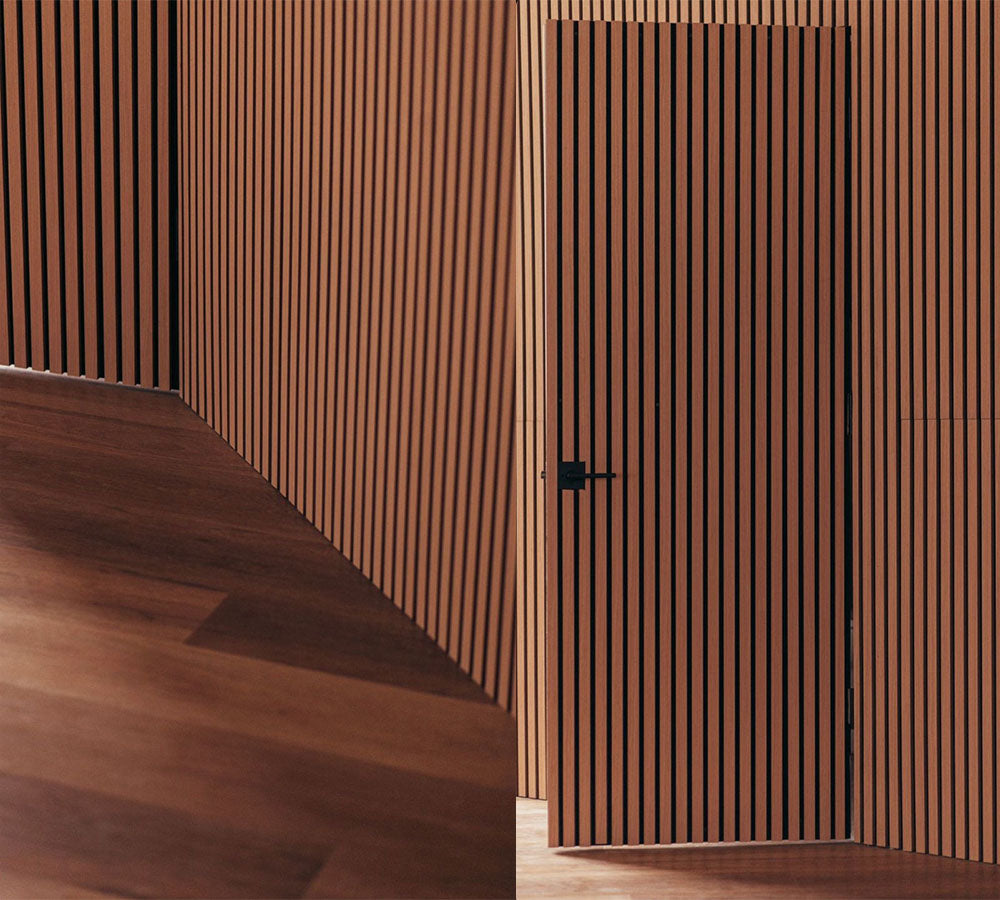
Creating a hidden door can add a touch of intrigue and mystique to any room in your home, while also keeping the room's aesthetic clean and consistent. By constructing a door that blends in with the surrounding wall, you can create a secret storage area, a hidden room, or simply a unique design element.
How Do You Create a Hidden Interior Door?
The hidden door look is achieved by cladding both an interior door, as well as a section of the wall around it, in one consistent material. By making the door and the wall the same material (that is ideally nearly seamless) the door becomes nearly invisible when it's closed.
Of course, this is impossible to do with just plain ol' drywall. To achieve a true hidden door, you'll need a wall material with its own texture that will appear uniform when the door isn't in use (i.e. when it's closed).
There are all kinds of decorative wall panelling that can be used for a project like this, and one creative, modern option is using pre-made wood slat acoustic panels.
Today, we'll look at not only some beautiful hidden door inspiration photos, but also give you some 9 clear steps on how to create a wood slat hidden door in your own space.

Materials Needed:
- Wood slat panels
- Pre-Hung Flush Door
- Black drywall screws
- Drywall anchors
- Circular saw
- Jigsaw (optional)
- Drill
- Drill bits
- Measuring tape
- Level
Step 1: Measure your Space
The first step in creating your hidden door is to measure the opening where you want the door to be located. Measure the height and width of the opening to figure out what size of pre-hung door you'll need.
Next, measure the space around the opening and decide how far you want the wood slat feature wall to extend beyond the doorway. This will help you in calculating how many panels you'll need.
Because you'll be covering the door in panelling as well, you'll want to calculate the total square footage of the space, including the doorway. Once you have that, you can use our handy Box Calculator on the product page to calculate how many panels you'll need for your project.
9️⃣ Have 9' ceilings? Use the box calculator for our 9' Wood Slat Wall Panels instead.
Step 2: Install the Pre-Hung Flush Door in the Doorway
For most DIYers, a pre-hung flush door is the best choice for a project like this. A door can be custom-built from MDF or wood, but that's a whole other project in of itself. For today, we're going to assume you're using a pre-hung door, or have already had a flush door built-in.
Install your pre-hung flush door in the doorway, ensuring it is square and swinging freely. Don't install the handle just yet!
If your builder or installer is building the door from scratch, they're probably trying to figure out what hinges to use for a wood slat hidden door. The answer can vary depending on the space, but in general you'll want to use recessed or hidden hinges to avoid any interference with the wood panelling and keep the hardware "invisible".

Step 3: Cutting the Wood Slat Wall Panels
Once your door is in and you have your measurements, it's time to cut the wood slat panels to clad the door with.
Measure the dimensions of the door first, starting with the height. Typically, you want each panel to be the same height as your door, depending on the door's clearance from the floor. If the door has a large clearance from the floor (more than 1/4"), you may want the panels to extend closer to the floor, to avoid it being obvious that there's a doorway there when the door is closed.
That being said, you don't want the panels to be too long, otherwise they may make contact with the floor (especially if your flooring expands slightly with seasonal changes).
Our recommendation: if the bottom of your door sits more than 1/4" above the floor, then do the following:
- Measure from the top of the door to the door to the floor
- Subtract 1/4" from that length
- Cut the first slat wall panel to that length
Example: If your door is 84" high and has a 1" gap between the bottom of the door and the floor, the distance from the top of the door to the floor will be 85".
In this case, subtract 1/4" from that 85" and cut your wood slat panel down to 84 3/4", which will leave 1/4" in clearance from the bottom of the slats to the floor.
If you want to be even more exact and your door is mounted perfectly plumb, you can choose to only subtract 1/8" or even 1/16" for your calculations, which will result in an even more low-profile look for the hidden door.
Whether or not this is the right choice for you depends on a few factors, namely how even your floors are, how plumb the door is, and how skilled you or your installers are at making accurate measurements and cuts!
Step 3.5: Cutting Holes for the Door Handle (Optional)
If you want to use a door handle as pictured below, you'll want to cut the opening for the hardware before fastening the panel to the door.
To do this, simply measure the distance from the top of the door to the top of your door handle opening, and mark that measurement on the panel. Depending on the style of door handle, you can use a hole saw, jigsaw, or even a hand saw to cut the opening in the panels.

That being said, many people opt for a completely hidden look and don't add a door handle at all, simply using one of the slats to grab the door when opening it.
All of our wood slat wall panels come pre-finished, so they can be easily cleaned with a damp cloth if and when fingerprints start to appear.
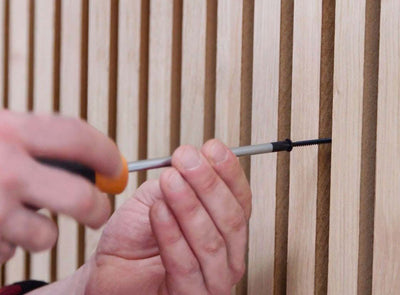
Step 4: Fasten the Wood Slat Panels to Your Door
Because the slat panels have a tongue-and-groove design to them, the most common installation method is to align the felt with the edge of the door, as shown below.

This will allow the slats to fit perfectly onto the panel that will be installed on the wall where the door and wall meet, creating a perfect tongue-and-groove fit that will minimize airflow and sound transmission between the two rooms.

How you attach the panels to the door is mostly a personal preference, but there are a few things to consider when it comes to selecting a hollow or a solid-core door.
Hollow-core doors won't hold screws very well, so an adhesive will work best if you're installing the panels on a hollow-core door. If using adhesive to install the panels, we recommend any construction adhesive that is rated for all surfaces or something like the LiquidNails Fuze-It Adhesive.
Solid-core doors are typically made with an MDF or particleboard core, which will hold screws well. If you'd prefer to screw the panels to your door, simply use black screws and insert them through the acoustical felt of each panel, between each slat. You can read more about how to install wood slat wall panels here.

Step 5: Adding Slats Above the Door Frame
This is the fun part! To create that oh-so-satisfying hidden door look, we're going to start adding pieces of wood slat wall panels around the edge of the doorway.
To start, measure the distance from the ceiling to the top of the door. Exact measurements are crucial here! Make sure you account for the thickness of your saw blade in your calculations, as you want the panels to fit snugly to make the installation as seamless as possible.
Cut a piece of one of the wood slat wall panels to that specific length, and install it on the wall above the door. Repeat this process (slowly) to complete the installation above the door. Again, you can use black drywall screws (use drywall anchors as well) or adhesive for this.

Step 6: Adding Panels Around the Door
When it comes to adding slats on either side of the door, place the door in the closed position before you start. Next, fit one panel next to the door opening with the felt tongue facing the door.
If you've followed all the steps until this point, the slat on the edge of the door should overlap perfectly with the felt tongue on the panel you're about to add.
Insert drawing of the door from a 45º angle, with the slat overhanging, as it closes onto the wall panels
Step 6.5: Add Your Hardware (If Needed)
If you cut a hole for your door handle, now's the time to install it. We won't dive into how to do that, if you can do all the other stuff we talked about, attaching the handle will be a walk in the park.
Step 7: IMPORTANT: Show Off to Any and Every Person Who Ever Steps Foot in Your House
What's the point of a secret door if you can't show it off? No matter how long you live in your home, you'll never grow tired of the "wow"'s from your guests every time you show off the James Bond-esque hidden door, hiding in plain sight.


1. Designing Your Own Stunning Living Room Accent Wall
2. Creative Ideas for Your Very Own Kitchen Accent Wall
3. 10 Creative Accent Wall Ideas for Your Home Office
4. Elegant Accent Wall Ideas to Elevate Your Bathroom Walls


What a fantastic guide on creating a hidden wood slat door! The step-by-step instructions and detailed insights make it seem so achievable. I appreciate the clever design tips and the emphasis on functionality. This DIY project is a game-changer for adding a touch of sophistication to any space. Can’t wait to try it out and explore more of your creative ideas. Kudos to Andor Willow for sharing such inspiring and practical content!
Love this DIY guide! Creating a hidden wood slat door seems like a fun and rewarding project. Your step-by-step instructions and tips make it approachable for any skill level. The added touch of customization adds a unique flair. Thanks for sharing this creative and practical idea!
Agree with Rob, would be great to have some advice on the hinges used for creating the look achieved in the first picture. Thanks! 😊
I read your article on the hidden door. It makes no reference to the hinges on the door which would stick out (in an outswing door). How are they concealed? I have seen the doors using a pivot hinge but this article does not make reference of a special hinge. Is it required to work ?
Leave a comment