


A Step-by-Step Guide on Installing Paintable Wall Panels

Table of Contents
Making your space (whether it's a room in your home or a new business venture) a little more alluring and versatile has never been easier than it is today with Paintable Wall Panels.
Technical Drawings
Each box contains four (4) panels, which fit together side-by-side to cover approximately 30 square feet. Exact measurements below.


Before You Start
Conditioning
Pre-conditioning of the panels is recommended in order to achieve equilibrium moisture content (EMC) before installation and reduce the likelihood of bowing or shrinkage after installation.

Therefore, Paintable Wall Panels from Andor Willow should be opened and stored for a minimum period of 48 hours at the same environmental conditions as the subsequent place of use, preferably in the room where the panels are to be installed.
Planning
Before starting your project, it is important to identify some key attributes of the area in which the material will be placed and to plan the installation of the panels, including but not limited to the following:
1. Wall type
What kind of wall are the panels to be affixed to? Is it a direct fix to studs, fitted onto masonry/brick, steel or timber frames, or are the panels to be used over existing plaster walls?

These considerations will inform which fixing method is appropriate and what preparation may be required to prepare the space, and the tools required.
2. Openings and cut-outs
How many windows or doors openings are in the project? Take note of any requirements to cut around outlets, air-conditioning vents, windows, or other similar features that will require panels to be pre-cut before fixing to the wall.
3. Internal and external corners
Planning for the joining of sheets and the overall layout will include noting where panels may be applied around an internal or external corner.
4. Mouldings and dado rails
If the use of mouldings and dado rails is anticipated, how high up the wall they are to appear, will they be interrupted by trim around windows or doors and what is the optimum height to achieve an unbroken line where practical, are all recommended considerations in the planning of the project.

Paintable Wall Panels Installation
There are three ways to install the Paintable Wall Panels:
1. Adhesive
The paintable wall panels can be glued to wall surfaces using grab adhesive or construction glue.
WARNING: Do not use adhesive to install the paintable paneling on ceilings.
2. Screws
Use screws to screw through the flat part of the decorative face and into your wall or ceiling. Use the appropriate fastening hardware or anchors depending on the material of your wall/ceiling, such as drywall anchors or masonry anchors for concrete walls. If installing into ceilings, ensure the panels are fastened into joists.
3. Finishing Nails
Using a nail gun, insert finishing nails through the decorative face of the panels and into a solid backing.
This installation method is recommended for installing into wood or MDF walls, or directly into studs to ensure that the wall panels add stability. It is not recommended for installing the panels on ceilings or directly into hollow drywall.
Installing Paintable Wall Panels with Adhesive
To install using adhesive, you will need:
- Construction adhesive, rated for PVC and/or all surfaces
- Level
- Finishing nails (if applicable)
- White wood filler (if also using finishing nails)

- To start, measure your space and decide on your installation location.
- Wash the installation location with a warm, damp cloth and allow to dry.
- Generously apply the adhesive to the panel in a criss-cross formation, before applying the first panel to your wall in the desired location. Use a level to ensure the panel is straight.
- Using nails to hold the panels in place until the adhesive has kicked is recommended.
- The panels do not have a tongue-and-groove connection, and should be snugly fitted side-by-side for the installation. If the installation surface isn’t square, seams may be visible prior to painting. Allow the adhesive to dry before applying any wood filler or spackling, which can be used to mask seams before painting.
Installing Paintable Wall Panels with Screws or Nails
To install using screws, you will need:
- Drill or nail gun
- 24-32 screws/nails per box, (1 1⁄2 inch in length)
- Level
- Drywall anchors (if applicable)
- White wood filler or drywall filler
- 150+ grit sandpaper

- To start, measure your space and decide on your installation location.
-
Put the first panel in place and insert the screws. We recommend a total of 6-8 screws per panel, spaced evenly around the edges and closer to the middle of each panel, as shown.
If using screws into hollow drywall, drywall anchors must be used. Hold the panel in place, and use a small drill bit to drill pilot holes where the screws will go, through the panel and into your wall. Remove the panel and insert the drywall anchors where the pilot holes are located. - Fit the second panel next to the one you just installed and repeat this process.
- The panels do not have a tongue-and-groove connection, and should be snugly fitted side-by-side for the installation. If the installation surface isn’t square, seams may be visible prior to painting. Spackling can be used to mask seams before painting.

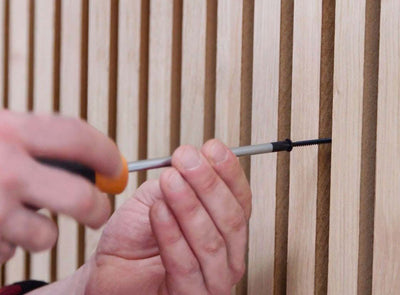
Screw or Nail Position
When inserting nails or screws into the panels, we recommend inserting them at the flattest point of the decorative pattern, as this will make for the easiest filling and sanding later on.
For the Fluted Panels, insert the nails at the lowest part of the pattern, where the surface is the flattest. For the Ribbed and Slatted Panels, insert the nails/screws at the thickest part of the pattern, as shown.
Cutting the Paintable Wall Panels
The paintable wall panels can be cut to size to suit your project.
WARNING: Cutting MDF will create dust. Always wear proper protective equipment, including a mask and eye protection.

The quality of your cut will be largely dependant on the sharpness of your blade. It is highly recommended to perform a test cut before starting your installation to understand how the panels will perform during cutting.

To cut the panels, we recommend the following:
- Circular saw (edge guide recommended) or a mitre saw
- Pencil
- Tape measure
- Speed square
- Sandpaper or sanding sponge
- Measure your cut and mark it with a pencil.
- With the decorative face facing upwards, use a circular saw to cut the panels. Using an edge guide or a speed square is recommended to achieve the straightest cuts.

Filling Seams and Holes
If you’re looking to mask any seams, screws or nails, vertical or horizontal, it is best to do so prior to painting. Use spackling or a water-based wood filler to fill in seams, and allow to dry.

If you used screws or nails during your installation, use a small dab of spackling to fill the holes, and wipe away any excess.
Allow the filler to dry, before lightly sanding the it using a sanding sponge or progressively finer sandpaper to leave behind a smooth finish. 100 grit or higher sandpaper is recommended. Be careful to sand gently to avoid sanding the primer of the panels.
Painting
Once the panels have been installed, holes and seams have been filled, and they and are ready to paint, prepare your space by taping off any exposed areas and laying protective materials in the area around the panels.
For large-scale installations, sprayers are the most efficient way to paint the panels. For smaller installations, brushes will work well. Rollers will be ineffective at fully covering the panels and are not recommended.
Use a soft brush to remove all sanding/processing dust before painting commences, and a vacuum with a brush accessory if needed.

Do not introduce oils, water or solvents in contact with the Paintable Panels during the prepping and painting processes.
Follow all paint manufacturer’s directions, including verifying that the pre-finished base primer is suitable for the intended painted finish. Ensure you adhere to guidelines for painting both exterior and interior surfaces.
Conclusion
It’s all about knowing the right techniques and strategies, while following correct methods and using the right tools and equipment that you are able to properly install paintable wall panels.
And there you have it — you have successfully installed your Paintable Wall Panels!

![]()
Not only will this elevate your space’s style, but it will also improve its functionality while giving you a refreshed ambience.
Just remember to take things slowly and always make sure that you follow every piece of our process. This way, you can have the paintable wall panel installed in the best way possible.


Leave a comment